Cakewalk // Documentation // SONAR X2 // Creating and editing automation envelopes
Table of Contents Previous Next Index

Automation ► Creating and editing automation envelopes

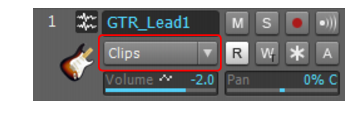
You can create automation envelopes for tracks, buses, clips and plug-ins. Drawing an envelope overwrites any preexisting envelope for the same parameter that occurs at the same time in the same track or bus.
To edit automation envelopes, first select the automation parameter from a track’s Edit Filter control (see Selecting the data type to edit), and use the global tools in the Control Bar’s Tools module (see Tools) to edit the envelope.
To control track automation, click a track’s Edit Filter control, point to Track Automation and choose the desired track parameter on the submenu menu. To control clip automation, point to Clip Automation and choose the desired clip parameter on the submenu. The Edit Filter menu uses bold text to indicate already created envelopes. For more information about using the Edit Filter, see Selecting the data type to edit.
Tip: You can quickly toggle between Track Volume and the last/previously shown data type on the current track. To do so, press the PLUS (+/=) key. This only works on the current parent track, not in Automation lanes.
The envelope appears in the Clips pane as a straight, dotted line in the envelope’s individual color, with a node (very small circle) at the beginning. When you move the cursor over the envelope, a vertical, double-ended arrow appears under it with the name and current value of the envelope in a box next to the cursor. The envelope’s vertical position reflects the current value of the parameter you are editing.
You can move an automated control while your project plays, and if you move it during a time where that control has a dotted line in its envelope, the control will stay where you move it. As soon as the Now time reaches a node or solid line, the control snaps to the value of the node or solid line.
A. Node B. Envelope name and current value C. Envelope value range
2.
Do one of the following:
list-image
With the Edit tool , click the node.
2.
Do one of the following:
list-image
With the Edit tool , position the pointer over the envelope segment you want to move, then drag the segment to the desired location.
2.
Do one of the following:
list-image
With the Smart tool , hold down the CTRL key and drag to insert two nodes at the selection boundaries.
list-image
With the Edit tool , position the pointer over the envelope where you want to insert a new node, then click.
list-image
With the Line tool , drag to add nodes at the mousedown and mouseup points. Hold down the SHIFT key and drag to add nodes at the Snap to Grid value.
list-image
With any pattern draw tools (Sine tool , Triangle tool , Square tool , Saw tool , or Random tool ), hold down the SHIFT key and drag to add nodes at the Snap to Grid value.
2.
Do one of the following:
list-image
With the Edit tool , drag the node to the desired location.
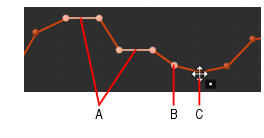
While moving nodes up or down, hold down the CTRL key to snap vertically to the previous node or two previous flat line segments. As the dragged node is snapped, the vertical snap target is highlighted. The global Snap to Grid settings are also active while the CTRL key is pressed.
A. Snap target (previous two flat line segments) B. Snap target (previous node) C. Node that is being moved
2.
Do one of the following:
list-image
With the Edit tool , double-click the node.
3.
Right-click the envelope and choose Clear All on the pop-up menu.
2.
Do one of the following:
list-image
With the Edit tool , position the pointer near the top center of the track/clip, then drag up/down.
3.
Do one of the following:
list-image
With the Smart tool , position the pointer within the selection near the top center of the track/clip until the mouse pointer looks like this , then drag up/down.
2.
Move the cursor over the segment of the envelope that lies between the two nodes until the double-ended arrow appears, then right-click the envelope and choose one of the following shapes on the pop-up menu:
list-image
Jump. This choice causes the envelope to make a ninety degree jump where the envelope reaches the second node. SONAR displays jumps with a dotted line, meaning that there is automation data at the nodes where the dotted line begins and ends, but not where the line itself is.
list-image
Linear. This choice draws a straight line between the two nodes.
list-image
Fast Curve. This choice draws a curve between the two nodes that changes value rapidly at first, but more slowly toward the end of the curve.
list-image
Slow Curve. This choice draws a curve between the two nodes that changes value slowly at first, but more rapidly toward the end of the curve.
Tip: You can also change an envelope segment’s shape with the Edit tool . To do so, select the envelope segment you want to change, then hold down the CTRL key and drag the selected envelope segment up/down.
3.
Set the Snap to Grid to the desired length of each cycle of the shape you want to draw. For example, if you want to draw sine curves, and you want each complete sine curve to last one beat, set the Snap to Grid to a value of Quarter. If the Snap to Grid is disabled, the default cycle is one measure.
4.
Click and hold the mouse button in the Clips pane at the place where you want to draw the envelope shape. The place where you click also sets the vertical midpoint of the shape.
5.
Drag up or down to set the vertical range of the envelope, then drag to the right or left to set the length of your edit. As you drag, the cursor’s vertical distance from the midpoint (the point where you originally clicked) determines the amplitude of the shape. To create a series of identical shapes, hold the SHIFT key down while you drag. To gradually increase or decrease the amplitude, gradually move the pointer farther from or closer to the midpoint.
Tip:  
list-image
list-image
To double the cycle frequency (for example, if snap resolution = quarter note, make each cycle an eighth note), hold down the CTRL key while you draw.
1.
Click the track’s Edit Filter control, point to Track Automation and choose MIDI to open the MIDI Envelope dialog box.
list-image
In the Type field, choose what kind of MIDI event you want to control with your envelope.
list-image
In the Value field, choose the name of the controller you want to edit.
list-image
In the Channel field, choose the MIDI channel that you want the envelope to send data on.
list-image
Click OK to close the MIDI Envelope dialog,
Note: MIDI envelopes you create in the Piano Roll Notes pane and MIDI envelopes you create in the Track view Clips pane are actually separate envelopes, even if they control the same parameter. Both kinds of envelopes are visible in the Clips pane, and should generally not be used to control the same parameter. You can convert Piano Roll view envelopes to Track view envelopes by selecting the time range and tracks that the Piano Roll envelopes occupy, then use the Track view Clips > Convert MIDI Controllers To Envelopes command.
2.
Do one of the following:
The Envelope Editing menu appears.
3.
Choose Delete Envelope from the menu.
1.
Select the data that contains the envelopes you want to delete—you can select parts of tracks, one or more whole tracks, or all tracks.
2.
Do one of the following:
list-image
Use the Edit > Delete Special command to open the Delete dialog box.
list-image
Press CTRL+ALT+X or use the Edit > Cut Special command to open the Cut dialog box.
3.
Select Track/Bus Automation if it’s listed.
4.
Select Clip Automation if it’s listed.
5.
1.
In the Track view or the Clips pane, select the track or clip that has the envelope you want to copy. If you want to copy all the automation data in the track, select the whole track.
2.
Press CTRL+ALT+C or use the Edit > Copy Special command.
The Copy dialog box appears.
3.
Choose Clip Automation and/or Track/Bus Automation.
Note 1: The basic Edit > Copy (CTRL+C) and Edit > Paste (CTRL+V) commands only apply to the data type that is selected in the track’s Edit Filter. The Edit > Copy Special (CTRL+ALT+C) and Edit > Paste Special (CTRL+ALT+V) commands open a dialog that lets you specify which elements to copy/paste.
Note 2: If the Track/Bus Automation field is greyed-out, you must re-select a part of the clip that contains either a node or a solid line (shape). A dotted line by itself is not an envelope and can not be copied.
4.
Choose any other kinds of data you want to copy—if you only want to copy the automation data, choose only Track/Bus Automation and/or Clip Automation.
5.
2.
Press CTRL+ALT+V or use the Edit > Paste Special command.
The Paste dialog box appears.
4.
The Envelope Editing menu appears.
3.
Choose Assign Envelope > (name of the parameter you want the envelope to control).
The mouse pointer provides helpful information when editing automation envelopes. The mouse pointer informs you if you are moving a single node, multiple nodes, a line segment, or a time selection. The following table shows the various mouse cursors.

Copyright © 2024 Cakewalk, Inc. All rights reserved
Sitemap | Privacy Policy | Legal